
 Purpose

Wire rope termination job is an integral part of the offshore industry, and it is only prudent to train personnel to do the job correctly to reduce chances of socket failure, that is wire slipping out of the socket joints. The aim of the course is to provide delegates with a thorough grounding of the requirements and safe working practices pertaining to resin socketing of wire ropes and to teach them the practical skills involved
Target Audience
Offshore contract workers, deck foreman, crane operator, fitters, safety officers, maintenance supervisors.
Course Content
Wire Rope Socketing
- A reference to all the legal documents underlining relevant responsibilities under the Health & Safety at Work Act, Provision and Use of Work Equipment Regulations and Lifting Operations and Lifting Equipment Regulations.
- Socketing Applications. An explanation of various relevant socketing applications. Factors influencing choice, assessing the operation and socket selection.
- Socketing methods & procedures. Including preparation, measurements, serving etc.
- Mixing and pouring of Resin.
- Socketing practices with ongoing assessment.
Step 1 – Measure Socket Bowl
To determine where to apply seizing wire, measure socket from bottom of socket to the top of the bowl.
The end of the rope should be long enough so the ends of the wires after being broomed will be at the top of the socket bowl.
Step 2 – Slide Socket onto Rope
Slide the socket into the rope about a meter down so that sufficient length of wire is to work with.
Step 3 – Apply Seizing Wire at Base of Socket
Apply the seizing wire one (1) socket bowl length from the rope end and continue to apply, working away from the rope end. The seizing length must be at least two (2) rope diameters long.
Plastic coated, plastic filled wire ropes and fiber cored ropes must have all plastic material and nonmetallic materials removed from within the broomed area. Only use soft annealed iron wire for seizing wire.
Step 4 – Broom Wire Rope End
Using a marlin spike, begin to open the strands. Using a short piece of pipe, bend each strand open to a 60 degree included angle.
Open strands evenly. Should the rope have a plastic coated core, remove all plastic coating. For fiber core ropes, cut out the fiber core.
Step 5 – Clean Wire Rope End
Swish the broomed-out rope end in a solvent and make sure that the wires are clean from the very bottom of the broom up to the seizing band. After cleaning, place the broomed-out rope end pointing downward. Allowing it to remain inverted until all solvent has evaporated and the wires are dry. Solvent should never be permitted to remain on the rope or on the serving band since it will run down the wires when the rope is turned upright.
Step 6 – Pull Broom Into Socket Bowl
Pull the socket up over the rope broom. Make sure the rope wires are uniformly spaced in the socket bowl, with the wire ends even with the top edge of the bowl and the axis of the rope and the axis of the socket are aligned.
The top of the seizing should be even with the bottom of the socket. Be sure not to allow any broomed wire to extend below the base of the socket.
Step 7 – Seal Bottom of Socket
Wrap the bottom of the socket with socketing putty, being sure to press the putty into the valleys between the strands.
To provide a greater seal, wrap electrical tape over the socketing putty.
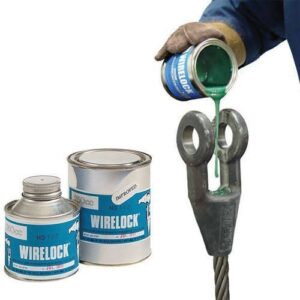
Step 8 – Mix Resin
Knead resin pouch for approximately 30 seconds prior to tearing open in order to mix the resin/silica thoroughly. Tear open the resin pouch and squeeze contents into mixing container provided. If the kit contains more than one resin pouch, be sure to pour all the resin into the mixing container before adding hardener pouches.
Tear open the hardener pouch and squeeze contents into resin. With a mixing paddle, thoroughly mix resin and hardener for at least 60 Seconds
until color is uniform, be sure to scrape bottom and sides of mixing vessel to ensure complete mixing.
Step 9 – Pour Resin Mixture into Socket
After mixing resin and hardener, immediately prepare to pour it into the socket. Position the provided “Fast Funnel” so that the resin will discharge out of the funnel into the socket bowl along the socket wall. This will help the resin reach the bottom of the bowl and reduce the chance of trapping air.
Fill to the top edge of the socket bowl. As resin mixture penetrates down into the bowl, it may be required to add more resin to the socket bowl. Never add more resin to the bowl after resin has begun to gel and harden.
Allow resin to firmly gel prior to moving assembly. Prematurely moving the assembly could damage the resin before it hardens; therefore, reducing the efficiency of the termination. Wait 15 minutes after the resin has gelled before moving the assembly
Step 10 – Re-Lubricate Wire Rope
After the resin has cured, re-lubricate the wire rope to replace any lubricant that may have been removed during the cleaning process.
Step 11 – Proof Test Assembly
It is recommended to proof load the assembly to twice the safe working load prior to putting the assembly into service per ASME B30.9.
| Course | Fee INR | Duration | Course Timing | Date Commence | Remarks |
|---|---|---|---|---|---|
| WRS | 15,000 | 1 day | 11:00 – 18:00 | On Demand | Practical Session |